Wednesday, 13 May 2015

[APP] [LIVE TV] [SPORTS TV] [ANDROID APP]

I'm back with an app that helps you in watching sports channel.
It works with MX player.
All sports channels are included
More Install and find yourself

WSS download link -

https://docs.google.com/file/d/0BzPSFCfavJ9bTU5FZWhCaG5RX28/edit?usp=docslist_api

read more...

Monday, 9 February 2015

[PC] [Trick] [Hide Files or Folders Using Command Prompt]

Hide Files or Folders Using Command Prompt

Trick to hide files and folders using Command Prompt
The most important thing is that, once hidden with this method, the files/folders cannot be viewed by any search options even if you click "Show All Hidden Files and Folders". 
Hiding the most wanted files and folders is very important nowadays and it's really a tedious job too. In order to make this tedious job an easy one, i'm going to deliver you a the trick now.
For Example: You have a folder named "collegephotos" and this folder is stored in (Disk Drive E). You think that it should not be seen by strangers who use your PC.

For that you need to follow the following instructions
  1. Press windowkey+R: Run command dialog box appears.
  2. Now type "cmd" and hit enter. A command prompt window displays.
  3. Now type "attrib +s +h E:\collegephotos" and hit enter.
  4. The folder "collegephotos" will be hidden (Note: It cannot be viewed by any search options)

    (To view this folder again, use the same command but replace '+' with '-' on both flags 's' and 'h')
Regards Team #A2P
read more...

[PC] [TRICK] [Resize a Hard Drive Partition with Easeus]

Resize a Hard Drive Partition with Easeus

Are you looking for the information how to resize your hard drive partition? Look no further. This page right here will show you the step-by-step how to re-partition your hard drive in an easy way.
And the best of all: It's all free! Thanks to Easeus for the free tool EASEUS Partition Master. Although, you may find serveral different editions from the Easeus homepage for the same purpose, the free Home Edition will take care of your re-partition need just fine.
While many people are well familiar with the term "re-partition", some others may wonder what it actually means, so here's a quick overview....
On many computers, especially pre-configured desktops and laptops, the hard drive is setup and configured with an operating system ("O/S") such as Windows, and it is allocated as one single partition (so called the "System drive" or "C drive"). However, many people find this setup inconvenient because of various reasons. One of them, and probably the most common reason is: They prefer to keep their user data separately, away from the operating system so that they don't loose all the user data when the system partition or Windows crash.
On the other hand, some other people just want to manage and configure their drives the way they like.
Re-partition the hard drive seems to be the right solution where users can resize their hard disks and create additional partitions even though an operating system has already been installed.
Some later versions of Windows such as Windows Vista and 7 come with a built-in feature called "Shrink Volume". You can try this out by going to Disk Managementand right click on a drive, then select Shrink Volume. We are not going to discuss the details about this built-in feature here; however, one thing to note: As you try it out, you might find it very disappointed because of the limited "maxiumum" size you can shrink, it'll just kill your hope.
Note: - Supported Operating Systems for EASEUS Partition Master v8: Windows 2000/XP/Vista/Windows 7 SP1 (32 bit & 64 bit)
Important: You will be altering your system drive and the operating system (Windows) by following the steps below. Proceed at your own risks.

To get started, first download a copy of EASEUS Partition Master v8.0.1 Home Edition (Free) here Or here.
  1. Install the Easeus tool then open it up the same way as you open any other program.
  2. On the main screen of the program, the bottom panel shows a list of available physical disks. The top panel displays the current partitions of the selected disk.

  3. Click to select the disk which you want to re-partition. As you click, the top panel will refresh showing the availble partitions for this drive.
  4. Right click on the partition which you want to resize. (You can right-click on the partition on either panel). Then select "Resize/Move Partition"

  5. At the Resize/Move Partition screen, double-check once again that you picked the right partition to resize. Then, adjust the "Partition Size" to change its size.
    As you're adjusting this number, the partition shown at the bottom is also changing its size and a new Unallocated partition is created.

  6. Once you're happy with the new size, click "OK".
  7. Now exit the program. Upon the attempt to exit, you'll get a prompt to apply the changes and another prompt asking to reboot to execute the operation. Click "Yes" on both prompts. Windows will now restart.
  8. At this time, you just need to sit back and wait. However, if you watch the screen, you'll notice that during Windows reboot, Easeus Partition tool will kick on and perform the changes. Once it's done, it will need to reboot a second time and then bring you back the normal Windows desktop. (At this time, you can either use Easeus or the Windows Disk Management tool to create a new partition for the new unallocated space you just made.
Regards Team A2P
read more...

[GUIDE] [TO CHANGE DIALER RESOLUTION BASED ON DPI]

GUIDE TO CHANGE DIALER RESOLUTION BASED ON DPI

1. Find and extract the Contacts.apk from your ROMs zip

2. Decompile it using one of the tools like APK Multitool

3. Find the file dimens.xml located in Contacts.apk\res\values-hdpi

4. Open it using Notepad++ and it should look like below:
<?xml version="1.0" encoding="utf-8"?>
<resources>
<dimen name="button_grid_layout_button_width">160.0px</dimen>
<dimen name="button_grid_layout_button_height">96.0px</dimen>
<dimen name="dialpad_additional_button_width">160.0px</dimen>
<dimen name="dialer_search_list_view_min_height">173.0dip</dimen>
<dimen name="dialer_search_list_view_max_height">396.0dip</dimen>
<dimen name="dialpad_divider_height">24.0dip</dimen>
<dimen name="dialpad_divider_width">3.0px</dimen>
<dimen name="dialpad_additional_button_height">96.0px</dimen>
</resources>

Now here you need to play with the values given in BOLD., i.e
button_grid_layout_button_width - Increase this for lower DPI value
button_grid_layout_button_height - Increase this for lower DPI value
dialer_search_list_view_max_height - This should be reduced by 3x times the value added to button_grid_layout_button_height 

All done.. Save the file then recompile the APK.. :good:

Regards Team#A2P
read more...

[Guide] [PC] How to Make Bootable Disc of Windows 7

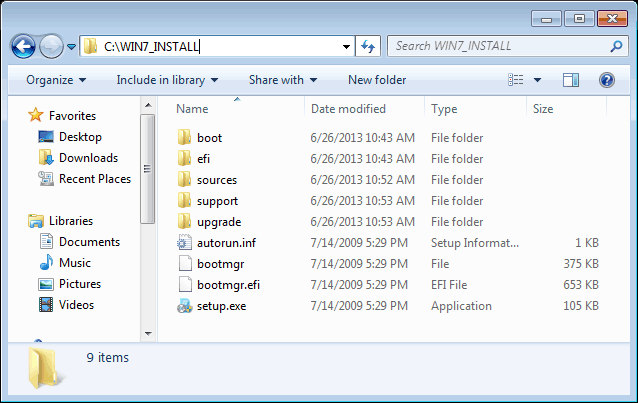
Below is a guide on how to create Windows 7 installation disc from pre-prepared source directory. The source directory should include all files copied from Windows 7 disc, which looks like follows,


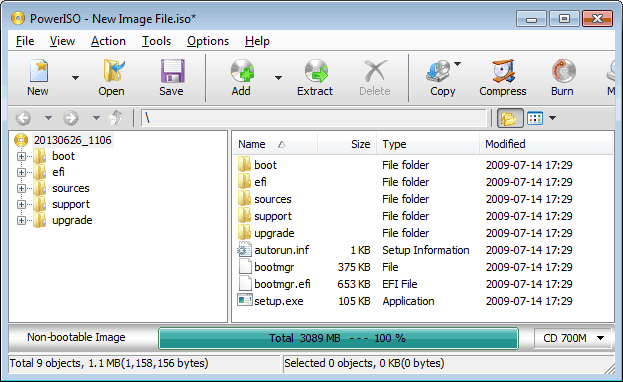
1. Start PowerISO. Download

2. Click "Add" button to add all files and folders under the source directory to current compilation.


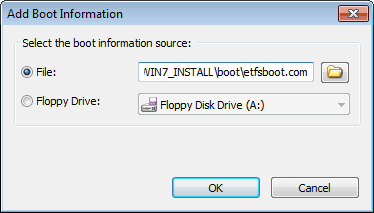
3. Click the menu, "Action --> Boot --> Add Boot Information...", and select etfsboot.com, then click "OK" to add it as boot file. 'etfsboot.com' can be found in the boot folder under the source directory.


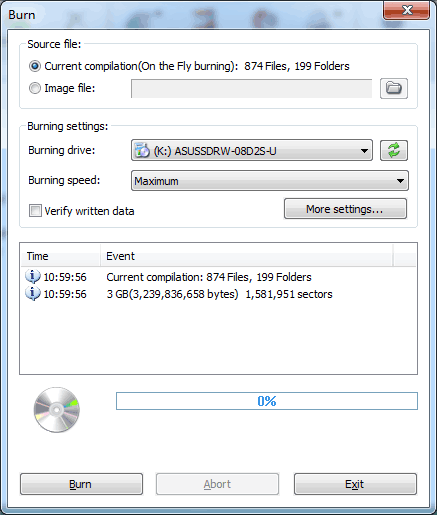
4. Insert a blank DVD disc in the writer, then click "Burn" button on toolbar to burn the current compilation to the disc.


If no errors occurred in the above process, you should now get a new Windows 7 installation disc.
You can also save current compilation to get a bootable ISO file.

step 4. You can burn the ISO file later to get the Windows installation disc.
Windows 8 and Windows vista installation can also be created using the similar way.

Regards TeamA2P
read more...

[Guide] [unite 2] How to make Readback method in Micromax Unite 2

Procedure:
1. Download and install drivers Driver_Auto_Installer_v1.1236.00.7z.
If not working try these too PDAnet_4150.rar.

2. Download scatter from here .

3. Open SP flash tools, load scatter in sp flash tools and go to read back tab. (alternative download link of sp flash tools)

4. Click 'Add' and tap on added read back entry.

5. Select any path to save file and click ok, write 0x3E180000 in length and click ok.

6. Click on read back and connect phone without battery. Wait till it completes.

7. Once you see a green circle, close sp flash tools and switch on the phone.

8. When the phone is on, connect it to pc. See if any notification of 'usb debugging' comes in phone, if not, go to settings->about phone->and tap build number 7 times to enable debugging options.

9. Go back and enter developers options(in settings), and check usb debugging on.

10. Now run mtk driod tools and it will detect phone. (alternative download link of mtk droid tools)

11. In mtk droid tools, click 'root, backup and recovery' tab.

12. Click 'To process file ROM_ from Flash Tool.

13. Locate the file you got from read back.

14. Say no to make CWM recovery automatically and cancel to choose a recovery for similar phone.

15. Now wait again.

Once done, you will get your sp flashable backup in MTK Driod Tools/backup.
Read back complete.
read more...

[Guide] [How To Use OTG PenDrive in Micromax A106]

Micromax Unite 2 has limited OTG support. Whenever you connect a pen drive it shows a notification "Checking for errors". Its a software bug not a hardware problem. In order to connect a pen drive you can either install USB OTG Helper or flash any custom ROM. As most custom ROMs are full of bugs so it is advised to root Unite 2 and mount pen drive using USB OTG Helper.

You need:
1. USB OTG Helper
2. ES File explorer 
3. Rooted phone 

To mount OTG drive follow these steps: 

Step 1: Open USB OTG Helper. Grant/Authorize root permission if asked.


Step 2: Open settings and select Automatic mount


Step 3: Close USB OTG Helper and connect pen drive

Step 4: Open ES File Explorer. Enable root explorer.  Go to folder /storage/usbotg/


Step 5: Long tap to select usbotg-sda1 folder then tap Add to desktop from menu


Step 6: Tap to open usbotg-sda1 folder from desktop everytime pen drive is connected to see pen drive contents


Important: Unmount pen drive before removing. Go to settings -> storage and tap Unmount USB storage


Note: If above method doesn't work then uninstall usb otg helper donate version and install usb otg helper free version from play store. Connect pen drive -> open usb otg helper -> tap mount (you'll see error code 9 if mount successful) -> open folder "/storage/UsbOtgDrive/drive_1" in es file explorer

- SOURCE: http://www.micromaxunite2.net

Regards - Team#A2P
read more...
 
Copyright © 2014 Team #A2P • All Rights Reserved.
Distributed By Free Blogger Templates | Template Design by BTDesigner • Powered by Blogger
back to top